Spectrum
This window shows the energy spectrum of photon (gamma and X-ray) radiation, recorded by the device over a certain period. When you connect the device to the program, it retrieves the spectrum data from the device. The spectrum graph is then updated either automatically at the interval specified in the settings or manually.
Additionally, a background spectrum graph can be overlaid on the spectrum graph.
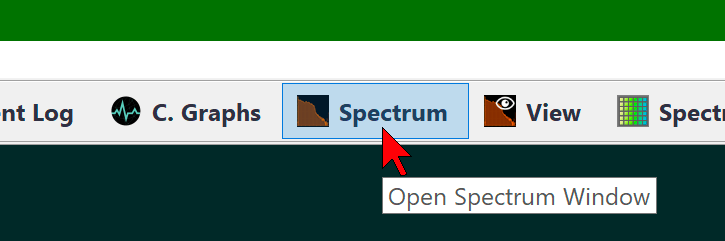
To quickly switch to the Spectrum window, click its button on the control bar of the RadiaCode:
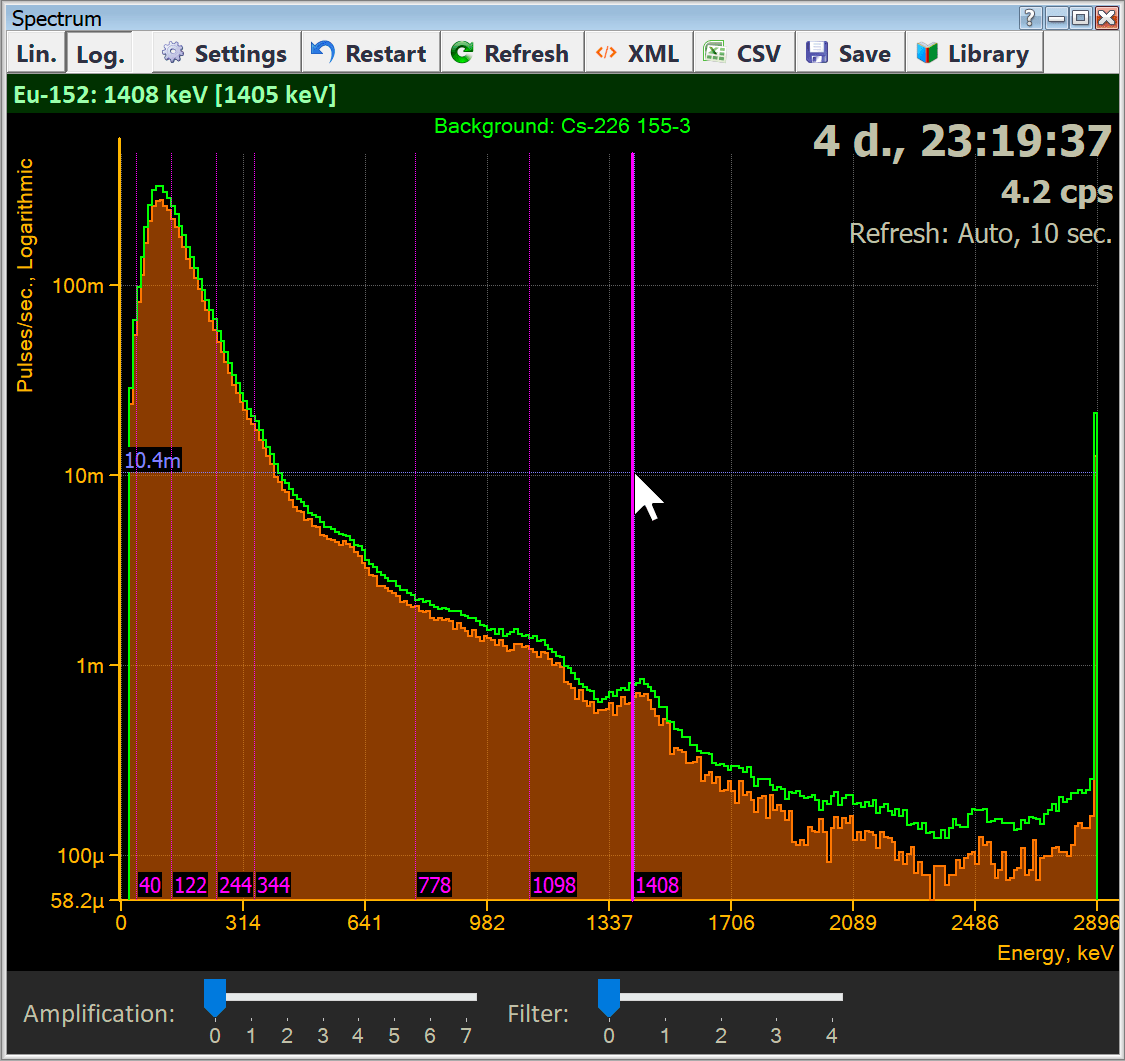
The graph is depicted as contiguous rectangles (histogram), each with a height corresponding to the number of pulses in the channel. The most recent channel includes not only its own data but also all the data outside the area displayed on the graph.
At the top right of the graph, the time for which the spectrum data was accumulated is displayed in the format HH:MM:SS. Below, the average pulse count rate is shown, which is the total number of pulses for all channels divided by the data accumulation time. The method of updating the graph is displayed even lower.
Depending on the settings, the X-axis can display either channel numbers or photon energy. The Y-axis can show either the number of pulses or the count rate. The Y-axis scale can be linear or logarithmic.
When you move the pointer over the graph, marker lines with numbers corresponding to the values on the axes are displayed. In the picture above, channel number 57 corresponds to 19 pulses.
Several settings manage the graph display. The most frequently used settings are located on the window control bar.
Buttons Lin. and Log. toggle the display scale on the Y-axis between linear and logarithmic.
“Settings” button or the local menu command “Window display options” opens the spectrum window settings dialog box.
“Restart” button or the local menu command “Restart accumulation...” resets the accumulated data after confirmation, and the accumulation process begins anew.
“Refresh” button or the local menu command “Refresh spectrum data” retrieves spectrum data from the device and updates the window. This button can also be used in automatic spectrum data update mode for immediate updates.
XML button or the local menu command "Export spectrum data to .xml file..." enables you to save the spectrum, possibly with a background, in an XML file for later viewing in programs like Becquerel-Monitor. You will be prompted to select where to save the file.
CSV button or the local menu command "Export spectrum data to .csv file..." allows you to save the spectrum in a simple text CSV format. The file name is generated by the program in the “YYYYY-MM-DD hh-mm-ss_Ns.csv” format, where “YYYY-MM-DD hh-mm-ss” is the current date/time and “N” is the accumulation time in seconds when the file was saved. You are prompted to select the folder where to save the file.
“Save” button or "Save Spectrum to Library..." local menu command: saves the spectrum in the database. In the future, the spectrum can be used as a background, exported, viewed, etc. If the “Set as current background” option remains enabled in the spectrum saving request dialog, the saved spectrum is selected as the background to be displayed alongside the spectrum. The name of the background is displayed at the top of the graph.
The “Library” button or the "Open Spectrum Library" local menu command opens the spectra library.
Amplification and Filtering
At the bottom of the spectrum window, there is a slider that controls the "enhancement" of the histogram. A curve of the following type is applied to the graph:
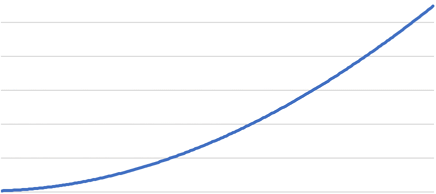
This enables subtle peaks to emerge on the graph. For each channel, the value is determined by the formula Vn = Vn · An · F + 1, where:
n - channel number
Vn - spectrum value (number of pulses or count rate) in channel n
An - the value at the corresponding point on the amplification curve
F - amplification factor, which is adjusted using the slider and ranges from 0 to 5.
In amplification mode, when F is greater than or equal to 1, the Y-axis digitization is not displayed.
The Filter Engine applies a smoothing algorithm to the spectrum graph. The higher the filter value, the smoother the graph becomes.
"Spectrum Window Settings" dialog box
In this dialog box, you can choose various display options for the “Spectrum” window.
| Dialog item | Description |
|---|---|
Y-axis scale | Select either a linear or logarithmic scale for the Y-axis. |
Y-axis units | Select either the number of pulses or the count rate, which is the number of pulses divided by the spectrum data accumulation time, as the units for the Y-axis. |
X-axis units | Choose either the spectrum channel number or the energy of this channel as the units for the X-axis. |
Overlay of Spectrum and Background | Display only the spectrum or both the spectrum and background. For backgrounds, refer to the Spectra library. |
Drawing the spectrum/background | Select how to draw the graph: fill with color and outline with a line, fill only, or outline only. |
Updating the graph | Choose how the graph is updated: either automatically at a specified interval (in seconds), or manually using the button on the window control bar. |
Calibrating the spectrum by emission energy | Here, you can specify the coefficients a0, a1, and a2 used to calibrate the spectrum by emission energy. When you open the dialog box, the coefficients read from the device are displayed. Spectrum calibration is performed to convert the spectrum channel number to the emission energy value in keV using a 2nd-degree polynomial of the form: E = a₀ + a₁X + a₂X², where x - channel number; a₀, a₁, a₂ - calibration factors. |
Reset to factory settings | Set the default values for the calibration coefficients. |
Isotope Library | If you select "Embedded", the Spectrum and View Spectrum windows will use the isotope library built into the RadiaCode program. If "Custom" is selected, the isotope information is taken from the specified file. |
Draw isotope lines | Draw the pink energy lines of isotopes on the graph. Disabling this option does not prevent the isotope information from being displayed at the top of the window. |
Draw a polyline instead of a histogram | Instead of using rectangular bars (histogram), draw a polyline that connects the midpoints of the tops of the bars. The graph is not entirely accurate because the accumulation of the spectrum remains discrete for each channel. |
Using the local menu command "Properties" -> "Colors," you can set the colors of the window graphs and panels:

Background Usage and Spectra Library
In the RadiaCode application, you can display not only the spectrum of accumulated emissions on the graph but also compare it with the previously measured background spectrum. You can simultaneously display the spectrum and background graphs in overlay mode.
To utilize a background, you must first measure it with the device over a period of time. Then, save the resulting spectrum to the spectrum library using the "Save" button on the window control bar or the "Save Spectrum to Library" option in the local menu.
When you save the spectrum, you will be prompted to name it. The spectrum will then appear with this name in the library list. If you keep the “Set as Current Background” option enabled, the spectrum will be displayed on the graph as a background after saving. You can also select the background from the spectra library in the future.
When using spectrum and background from different Radiacode devices, keep in mind that different devices have varying calibration factors. When overlaying spectral graphs, the application compares them channel by channel (the first channel with the first channel, the second channel with the second channel, etc.). Different devices have different emission energies corresponding to the same spectral channels. Therefore, when graphs from different devices are superimposed, differences in the positions of the peaks corresponding to the same emission energy will appear.
If the program detects such a situation, a warning will appear at the bottom of the window in the engines panel. The RadiaCode device is identified by its serial number.
Spectrum Library
The spectra library can be accessed through the "Spectra library" option in the local menu of the "Spectrum" window, the "Spectra Viewer" window, or via the "Spectra library" command in the "Tools" menu of the main application window. The list of saved spectra is displayed:
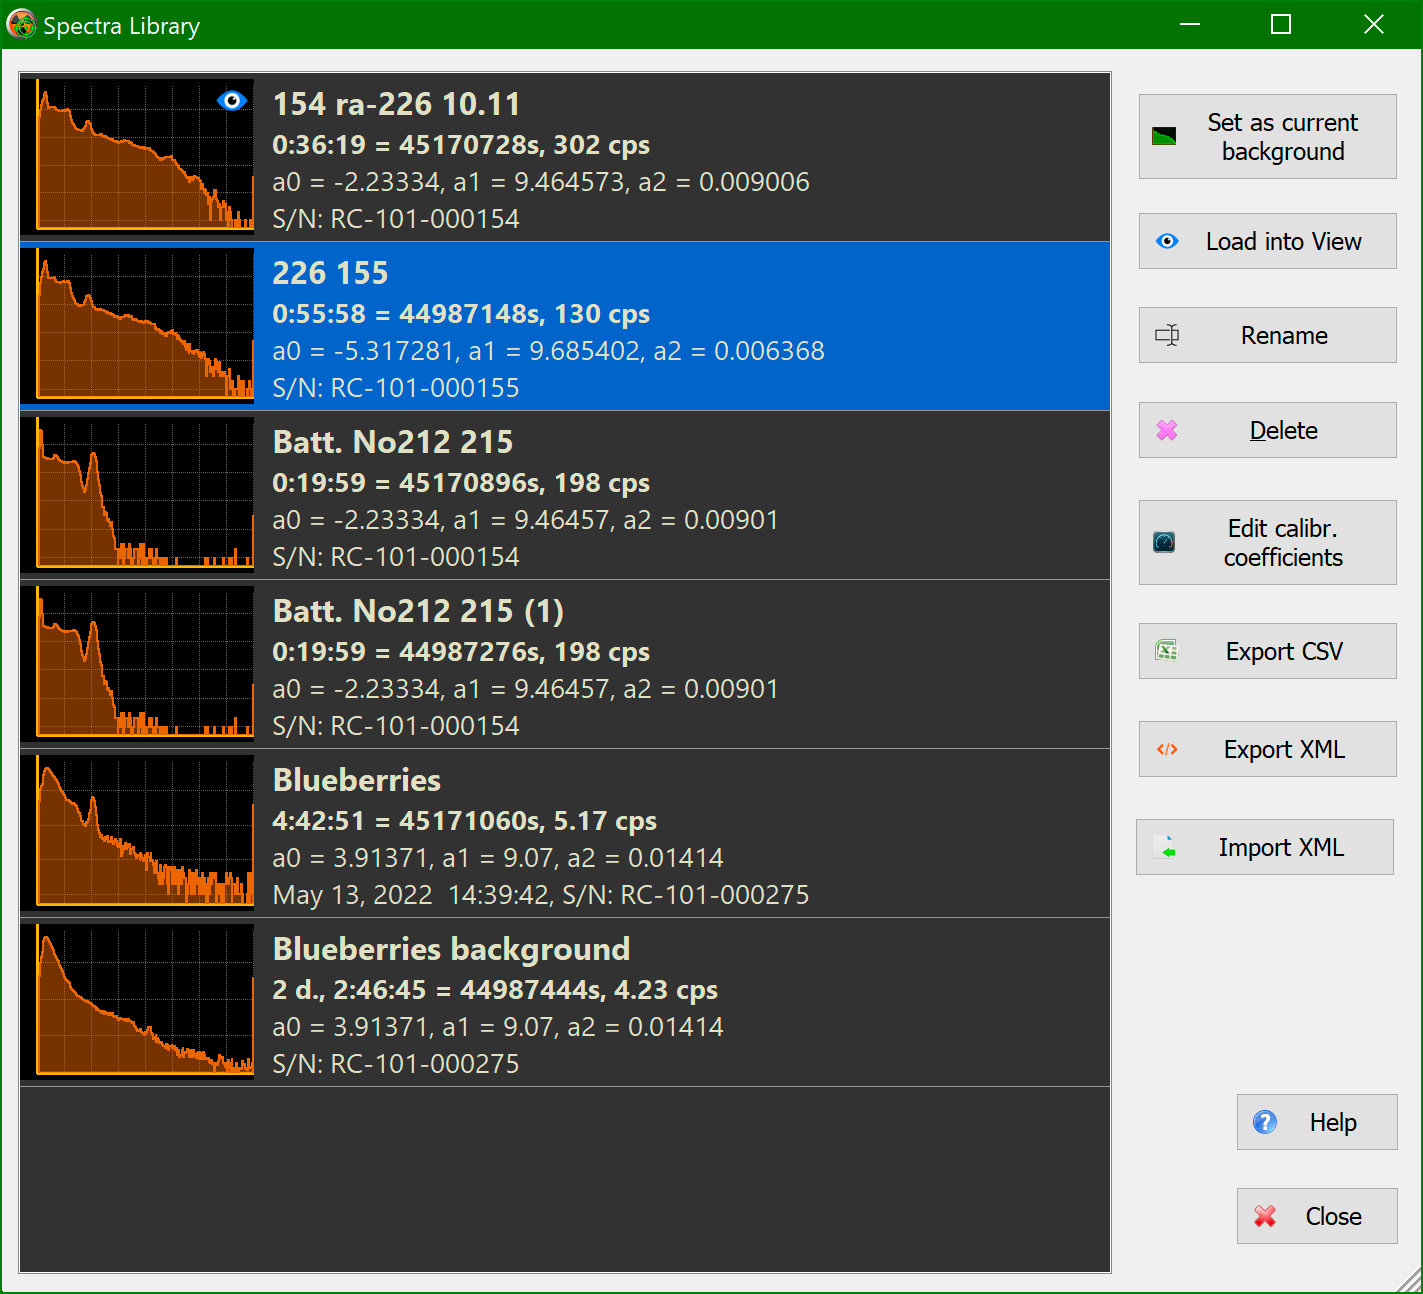
The graph of the spectrum selected for display is shown in green.
For each saved spectrum, its graph on a logarithmic scale and information about the spectrum parameters are displayed.
Dialog buttons execute actions on the selected spectrum or spectra in the list:
- Set as the current background:Select the spectrum to display as a background in the Spectrum and View Spectrum windows.
- Load to view:Load the spectrum to view in the View Spectrum window.
- Rename the spectrum: Assign a new name to the spectrum.
- Delete:Remove the data of a spectrum or multiple selected spectra from the library.
- Edit calibration factors:A dialog window opens where you can set calibration factors a₀, a₁, and a₂ for the selected spectrum or spectra. This can be useful if the device used to take the spectrum/spectra was recalibrated.
Spectrum calibration is conducted to convert the spectrum channel number into the emission energy value in keV, using a 2nd-degree polynomial of the form:
E = a₀ + a₁X + a₂X²,
Where x is the channel number.
and a₀, a₁, a₂ are the calibration coefficients.
- CSV export: save the spectrum in a CSV text file.
- XML export: save the spectrum in an XML text file.
- XML import: load the spectrum/background into the library from an XML file that was previously saved when exporting from the RadiaCode application or the RadiaCode app on a smartphone.
Displaying Isotope Information
As you move the cursor along the graph, information about the radioactive isotope, whose energy corresponds to the cursor's position, is displayed at the top of the graph.

The isotope's name, its corresponding energy, the energy at the cursor line on the spectrum graph, and the decay chain name for the isotope are displayed in square brackets.
The thick pink line on the spectrum graph indicates the position of the isotope's energy line. If the isotope has additional lines, they are represented by thin pink lines.
If there are several isotopes with similar energies, information about the isotope whose energy line is closest to the cursor's energy value is displayed.
In the spectrum settings, you can disable the display of isotope information.
The RadiaCode includes a built-in isotope library. In the spectrum settings, you can choose your own isotope library file.
Connecting an External Isotope Library
To enable the application to use an external isotope library instead of the built-in one, you must create a text file containing isotope information and select it in the spectrum settings.
Each time you start the RadiaCode application, it copies its internal isotope table to the file AppIsotopes.csv located in the same folder as the program's executable file. The AppIsotopes.csv file can be used as a template for adding custom isotopes.
The library file containing isotope information is in text format. Each line in the file describes a single isotope, with fields separated by semicolons.
Example:
U-235; U-238; 750,1001; 190
Lu-176; 55,307; 202
In Microsoft Excel, these lines appear as follows:
| Isotope | Decay Chain | Energy lines | Main Line |
|---|---|---|---|
U-235 | U-238 | 750,1001 | 190 |
Lu-176 | — | 53,307 | 202 |
- Field 1: Isotope name (required)
- Field 2: Decay chain name (optional)
- Field 3: Energy of accompanying lines, separated by commas (optional)
- Field 4: Main line energy (required)
When loading a file, the application verifies the accuracy of the information and, if errors are found, displays the appropriate messages. Please note that empty fields must still end with a semicolon to ensure the total number of fields is exactly four.
Export and Import of Spectra
Exporting a spectrum involves saving its data to a CSV or XML text file. To perform an export, there are corresponding commands in the local menus of the "Spectrum" and "View Spectrum" windows, as well as buttons in the "Spectra Library" dialog box.
Two formats are supported: XML and CSV. Both formats are compatible with the popular Becquerel Monitor software.
An XML file can simultaneously include both a spectrum and a background, containing all relevant information such as names, number of channels, spectrum accumulation time, calibration factors, and the serial number of the device used to capture the spectrum and background. This format is self-sufficient and does not require the user to perform additional import steps.
A CSV file is a text file with a .csv extension that can be used not only with the Becquerel monitor but also with other applications due to its simple format. Only pairs of values, "channel number, number of pulses," are written to the file. The file name is formatted as "Spectrum_<Current date/time>_<Accumulation time in seconds>s.csv", for example, Spectrum_2021-05-12_13-53-55_1426s.csv.
Importing a Spectrum to the Library
You can import a spectrum into the spectrum library from an XML file that was previously saved by exporting it from the RadiaCode application on your computer or smartphone.
Updated: Jan 9, 2026