Variables
The “Variables” window allows you to view the values of special function registers (SFR) of the device and change these values.
The “Variables” window you just opened contains a single tab called “Main.” You can add more tabs using the “Add new page” local menu command, and you can also change the name of any existing ones. The tabs operate independently of each other, with each tab equivalent to a separate “Variables” window. You can also open multiple “Variables” windows.
When you add a new register (“variable”) to this window, RadiaCode places it on the active tab of the current “Variables” window.
You can use the Ins key or the Ctrl+A hotkeys to add a variable to the “Variables” window.
The window will highlight the selected object in color. To choose another object, click on it or use the cursor keys.
Display Options
The window contains vertical and horizontal grids, which can be enabled or disabled independently.
When the vertical grid is enabled, the data in the window is organized into columns, each with a button as its title. Pressing the Name, Type, and Address buttons opens the “Display options” dialog box for the selected variable in the window. Pressing the Value button opens the “Change value” dialog box for the selected variable.
When the vertical grid is disabled, double-clicking on the line containing the object opens the “Change value” dialog box for that variable.
To enable or disable the vertical or horizontal grid, use the corresponding checkbox in the “Fonts” tab under the “Configuration” menu, and select the “Environment” command.
Local Menu
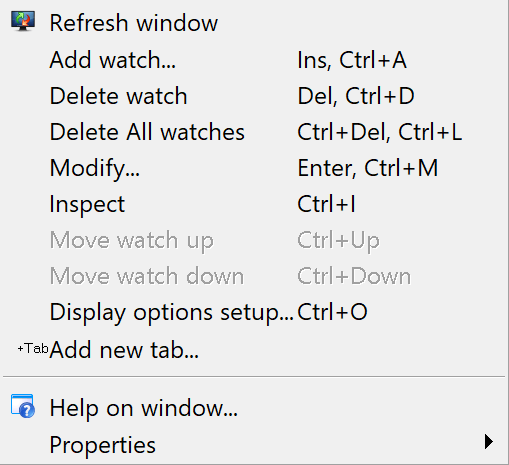
The local window menu includes the following commands, each with a button on the window toolbar:
| Command | Description |
|---|---|
Add Variable/Expression | Add one or more objects to the window. Open theAdd a variable to the windowto select an object by name. |
Delete Watch | Removes the selected object from the window. |
Delete All Watches | Removes all objects from the window. |
Modify | Opens the “Modify” dialog box to set a new value for the selected variable. You can also achieve this by simply typing a new value on the keyboard. |
Move Watch Up | Moves the selected object in the list up by one line. |
Move Watch Down | Moves the selected object in the list down by one line. |
Display Options | Opens the “Display options” dialog box to modify the display parameters of the selected object, and to add or remove tabs in the window. |
Add New Page | Functions similarly to the 'Add page' button in the 'Display options' dialog box. |
Window Help | This is referred to as contextual help. |
Properties | Manages window properties such as font, colors, and more. |
"Display Options" dialog box
This dialog box manages the options for displaying the selected variable or expression in the "Variables" window, and it adds or removes tabs in this window.
| Dialog Item | Description |
|---|---|
Variable Name | Contains the name of the selected variable. |
Display Format | Specifies the representation format for the selected variable: binary, hexadecimal, decimal, or ASCII. |
Pop-up Description | Enables pop-up descriptions for special-purpose registers. |
Display Bitmap | Includes pop-up descriptions of special-purpose register bitmaps, if applicable. |
Display Bit Descriptions | Enables pop-up descriptions for special purpose register bits, if available. |
Automatic Name Field Size | When this option is selected and the vertical grid is enabled (see note below), the window automatically adjusts the "Name" column to fit the longest record in the column. |
Pages | List of tabs in the window. |
Add Page | Opens the “Add new page to Variables window” dialog box, to enter the name of a new tab. Window creates new tab by pressing “OK”. |
Delete Page | Deletes the tab highlighted in the “Tabs” list. |
Edit Page | Opens the "Set page name" dialog box to edit the tab name. |
To enable the vertical grid, go to the Configuration menu, open the Screen Options dialog, navigate to the Font tab, and check the Grid checkbox.
Updated: Jan 9, 2026