Point Source
Measurement procedure
1. Charge the device to at least 50% capacity and, using the “Spectrum” mode, generate a background spectrum set. When obtaining the spectrum, the device should always remain in the same location where the activity measurement will be conducted. To enhance measurement accuracy, it is recommended to obtain spectra for at least 8 hours, and if possible, for a day or more. Save the acquired spectrum to the spectra library with the name “Background Date/Location” or something similar.
2. Open the “Activity” tab of the application, and in the dropdown list of the “Geometry”, select “Point source 5 cm”.
3. In the “Background” line, select the previously obtained background spectrum.
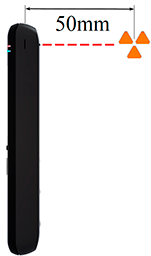
4. Position the powered-on device and the source at a distance from each other so that:
- the “+” sign on the rear cover of the device is facing the source;
- the geometric center of the source was aligned with the “+” sign, perpendicular to the rear cover of the device;
- The distance to the source, measured from its geometric center to the geometric center of the scintillator, is 5 cm. The projections of the scintillator center on the side surfaces of the device are marked, and the projection on the back cover is indicated with a “+” sign.
The figure below shows the correct location of the source:
5. At the bottom of the “Activity” tab, in the spectrum histogram display area, click the button with the triangle icon to begin the measurement.
6. Continue taking measurements until the minimum detectable activity (MDA) values and the measurement error reach acceptable levels for you.
Updated: Jan 9, 2026