Schnellstart-Handbuch
Lerne, wie du das Gerät benutzt, und leg mit dem Entdecken los.

Einführung
Diese Seite ist ein schneller Leitfaden, wie Sie Ihr neues Radiacode-Gerät in Betrieb nehmen. Erfahren Sie mehr über die Hauptmerkmale, verfügbaren Anwendungen und Einstellungen, um Ihr Radiacode schnell für die Erkundung einzurichten!
Gerätezweck
Radiacode ist ein tragbarer Detektor und Spektrometer für ionisierende Strahlung, der für den Hausgebrauch und die wissenschaftliche Erforschung der Umgebung entwickelt wurde.
Hauptmerkmale
- Nahezu sofortige Reaktion auf Änderungen der Strahlungsumgebung dank eines hochsensiblen Szintillators, eines Festkörper-Photomultipliers und fortschrittlicher Software
- Fähigkeit, das Energiespektrum der absorbierten Strahlung zu visualisieren
- Verknüpfung der Messergebnisse mit den Koordinaten des Forschungsstandorts, Verfolgung auf Google Maps (bei Verbindung mit einem Smartphone)
- Hohe Genauigkeit der Dosisleistungsmessungen aus verschiedenen Strahlungsquellen durch Energiekompensation der Dosisleistung
- Ereignisprotokoll und Grafiken, die Messungen für den gesamten Zeitraum des Gerätebetriebs anzeigen (wenn mit einem Smartphone verbunden)
- Individuelle Temperaturkalibrierung beseitigt den Einfluss von Temperaturschwankungen auf alle Messungen
- Kann sowohl im Standalone-Modus als auch in Verbindung mit einem Smartphone oder einem Windows-PC arbeiten
- Langlebiger Akku - bis zu 200 Stunden (oder 290 Stunden für das Modell Radiacode 110)
- Großes Volumen an eingebautem Speicher - bis zu 1000 Stunden eigenständige Registrierung
- Display-Hintergrundbeleuchtung mit automatischer Umschaltung in dunklen Umgebungen
- Automatische Drehung des Displays entsprechend der Geräteausrichtung
- IP64-Schutz vor Spritzwasser und Staub
Weitere bemerkenswerte Merkmale
- Ihr Radiacode-Gerät ermöglicht es Ihnen, die Umgebung kontinuierlich zu überwachen, und die Ergebnisse sind immer verfügbar, solange das Gerät eingeschaltet ist. Die gesammelten Ergebnisse können als Dosisrate, Zählrate, akkumulierte Dosis oder als Energiespektrum angezeigt werden.
- Der Radiacode quantifiziert ionisierende Strahlungsparameter und zeigt die Werte in Einheiten wie Sievert (Sv), Röntgen (R), Zählungen pro Sekunde (CPS) und Zählungen pro Minute (CPM) an.
- Der gemessene Dosisleistungswert wird zusammen mit seinem Fehlerniveau angezeigt.
- Dosisrate, Zählrate und akkumulierte Dosis werden mit einer zusätzlichen grafischen Skala angezeigt.
- Alarmton und Vibrationssignal – sowohl am Dosimeter als auch auf einem Smartphone. Zusätzliches Alarmlichtsignal am Dosimeter.
- Die Messdaten des Radiacode-Geräts können nahtlos an einen Computer oder ein Smartphone zur weiteren Analyse übertragen werden.
Software und Handbücher erhalten
Um das volle Potenzial auszuschöpfen, können Sie eine App für Ihr Telefon herunterladen oder das Gerät mit einem Windows-PC verbinden.
- Android-App für Geräte mit Android 6 und höher mit BLE-Verbindung (Bluetooth 4.0 und höher)
- iPhone- und iPad-App für Apple-Geräte mit iOS 17.0 (oder höher). Die App ist auch für Mac-Geräte mit macOS 14.0 (oder höher) und Apple Silicon-Chips verfügbar.
- Software für PCs mit Windows 7 oder höher
- Radiacode 10X Gerätehandbuch (PDF)
- Radiacode 10X Android App Handbuch (PDF)
Lieferumfang
- Radiacode Gerät
- USB Type-C Kabel
Steuerung und Anzeige

Verfügbare Tasten und Anzeigen
- Standort des Strahlungssensors, des digitalen Thermometers und des Geräteausrichtungssensors.
- Umgebungslichtsensor (für die automatische Einschaltfunktion der Hintergrundbeleuchtung).
- Eingebauter Batteriestatus: Ladezustand (4 Varianten), Ladevorgang, Stromversorgung von externer Quelle (Ende des Ladevorgangs).
- Schwingtasten-Kontrollanzeige: gesperrt, entsperrt.
- Externes Verbindungssymbol: USB, Bluetooth.
- Tonstatus (ein oder aus)
- Alarmsignal: Vorhandensein und Pegel.
- Temperaturanzeige des Strahlungssensors.
- Aktuelle Uhrzeit.
- Schwenktaste: «oben» für Linkshänder-Ausrichtung, «unten» für Rechtshänder-Ausrichtung.
- USB-Typ-C-Anschluss: zum Laden des Geräts und Datenaustausch.
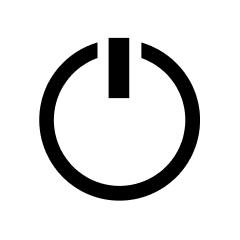
- Runder Knopf: zum Einschalten und Bestätigen.
- Schwenktaste: «unten» für Linkshänder-Ausrichtung, «oben» für Rechtshänder-Ausrichtung.
- Grafische Darstellung der Dosisrate.
- Numerische Darstellung der Dosisrate.
- Standort des Lautsprechers.
- Dosisraten-Einheiten.
- Zwei Lichtsignalanzeigen: Ladung (blau); Registrierung von Gammaquanten (grün bei niedrigem Niveau, rot, wenn der Alarmgrenzwert überschritten wird).
- Zufälliger Fehler bei der Schätzung der Dosisrate (bei einem Konfidenzniveau von 0,95).
Die in diesem Handbuch gezeigten Bilder können vom tatsächlichen Aussehen des Produkts abweichen.
Betriebsbeschreibung
Bevor Sie das Gerät verwenden, laden Sie es 2 Stunden lang auf.
Um es einzuschalten, drücken Sie die runde Taste und halten Sie sie 3 Sekunden lang gedrückt. Wenn der Bildschirm angeht, bedeutet das, dass das Gerät eingeschaltet und einsatzbereit ist.Ein- und Ausschalten
Nachdem das Gerät eingeschaltet wurde, beginnt es kontinuierlich, die Umgebungs-Äquivalentdosisleistung (AEDR), die Zählrate, das Energiespektrum der absorbierten Strahlung zu schätzen und eine Schätzung der Umgebungs-Äquivalentdosis (AED) zu akkumulieren. Über ein Menü des Geräts können Sie diese Parameter auf dem Display anzeigen.
Der Dosimeter hat vier Anzeigemodi zur Bewertung der Messergebnisse, der Wechsel zwischen diesen Modi ist über das Menü möglich. Wenn das Radiacode-Gerät eingeschaltet wird, startet es im MONITOR-Modus (siehe Beschreibung unten).
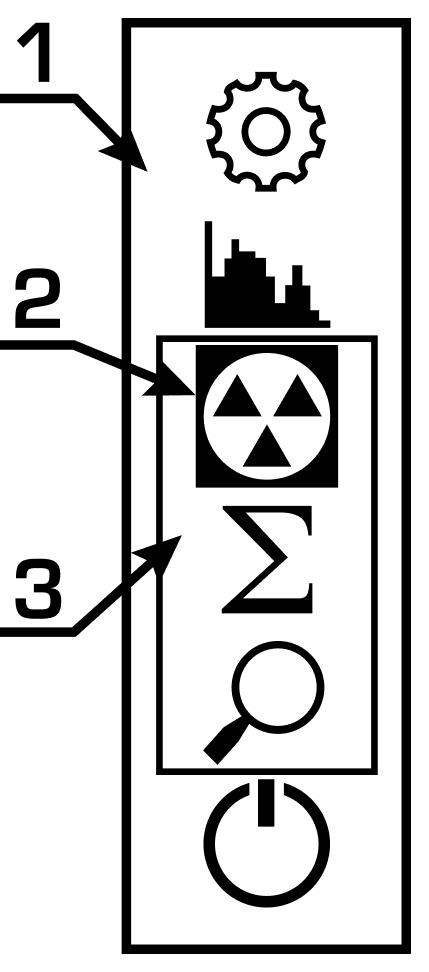
Während in einem der Anzeigemodi öffnet ein langer Druck auf die runde Taste den Zugang zum Menü [siehe 1, Symbole aller Menüelemente]. Nach dem Betreten des Menüs sind drei Elemente gleichzeitig sichtbar [3]
Die Navigation durch das Menü erfolgt durch kurzes Drücken der Wipptasten «oben» und «unten». Wenn die Wipptaste gedrückt gehalten wird, werden die Elemente schnell nach oben oder unten gescrollt. Das ausgewählte Element ist mit einem negativen Symbol [2] markiert. Um die Auswahl zu bestätigen, drücken Sie kurz die runde Taste.
Das Umschalten zwischen den Anzeigemodi der Messung sowie das Betreten und Navigieren im Untermenü EINSTELLUNGEN unterbrechen nicht die Sammlung und Verarbeitung der geschätzten Strahlungsdaten.
Um das Gerät auszuschalten, verwenden Sie den entsprechenden Menüpunkt [siehe 1, letzter Punkt].
Die folgende Tabelle zeigt die Menüsymbole, Elementnamen und eine kurze Beschreibung der relevanten Dosimeterreaktionen.
Menüsymbole
| Symbol | Name | Beschreibung |
|---|---|---|
| Eingabe des Untermenüs für die Geräteeinstellungen | |
| Anzeige des Energiespektrums der Photonstrahlung | |
| Anzeige der aktuellen Dosis-/Zählrate | |
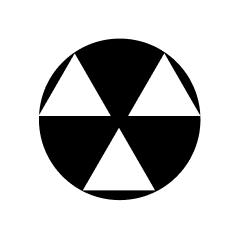
| Anzeige der akkumulierten Dosis von Photonstrahlung (Gamma- und Röntgenstrahlung) | |
| Anzeige der Zählrate in Form eines Graphen | |
| Ausschalten des Geräts |


Die Funktion der Tasten kann in verschiedenen Anzeigemodi und im Untermenü EINSTELLUNGEN unterschiedlich sein, dies wird in der untenstehenden Tabelle kurz beschrieben:
Einstellungen Symbole
| Symbol | Name | Beschreibung | Bild |
|---|---|---|---|
| Hoch/Runter-Tasten - Navigation durch die Einstellungen: Einheiten, Alarme, Anzeigeparameter, Signale, Bluetooth, Sprache, Zeit/Datum, Geräteinformationen. | 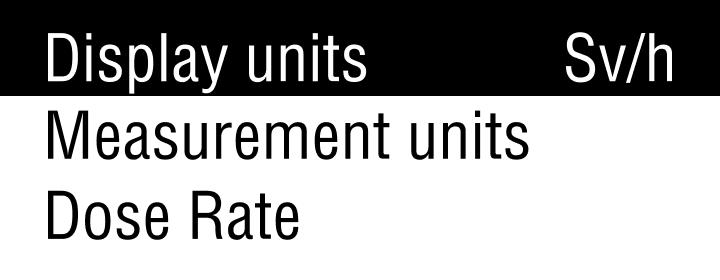 | |
| Obere Taste - Typänderung der Spektrum-Amplitudenskala: logarithmisch oder linear Abwärtstaste - kurzer Druck - Energieskalenbereich | 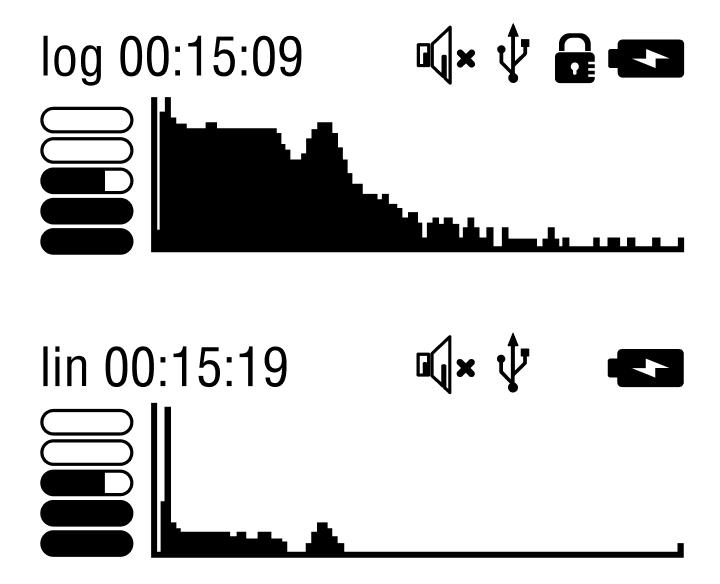 | |
| Anzeige der aktuellen Dosis-/Zählrate | 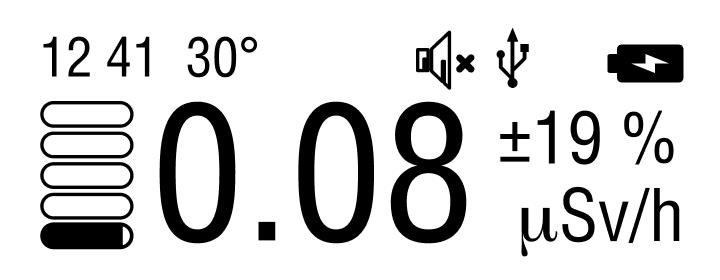 | |
| Anzeige der akkumulierten Dosis von Photonstrahlung (Gamma- und Röntgenstrahlung) | 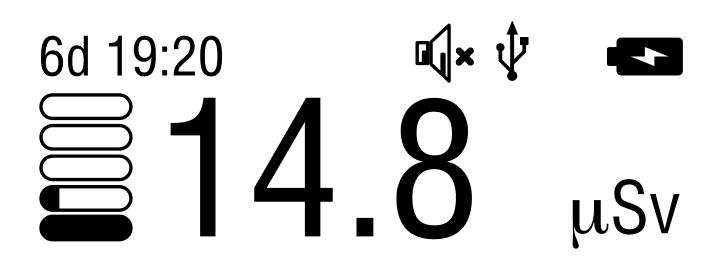 | |
| Anzeige der Zählrate in Form eines Graphen | 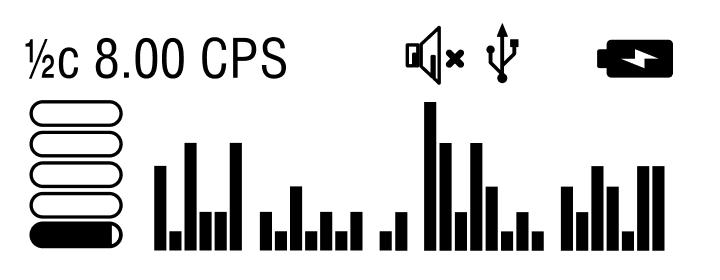 |
Ein langer Druck auf die "Hoch"-Taste in den Modi SPECTRUM, MONITOR, DOSE und SEARCH schaltet den Lautsprecher ein/aus. Ein langer Druck auf die runde Taste in diesen Modi sperrt/entsperrt die Wipptasten. Wenn die entsprechende Funktion aktiviert ist, wird die Hintergrundbeleuchtung automatisch eingeschaltet, wenn die Wipptasten im Dunkeln entsperrt werden.
Die folgende Tabelle bietet eine kurze Beschreibung der Untermenüeinstellungen:
Untermenüeinstellungen
| Name | Beschreibung | Bild |
|---|---|---|
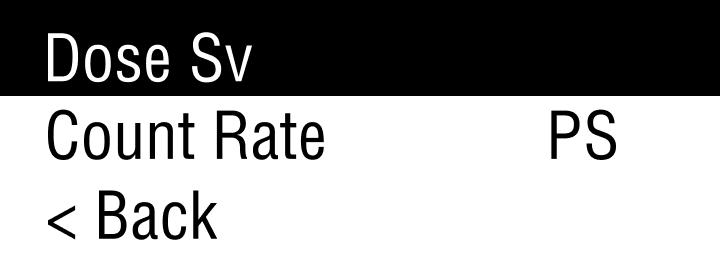
Anzeigeeinheiten | Auswahl der Anzeigeeinheiten für den MONITOR-Modus (abhängig von den Messeinheiten, siehe unten): Sv/h oder R/h für die Dosisratenwahl, CPS (Zählungen/s) oder CPM (Zählungen/min) für die Zählratenwahl. | |
Maßeinheiten | Auswahl der Maßeinheiten:
|  |
Dosisrate | Einstellungen der Schwellenwerte 1 und 2 für Dosisratenalarme | 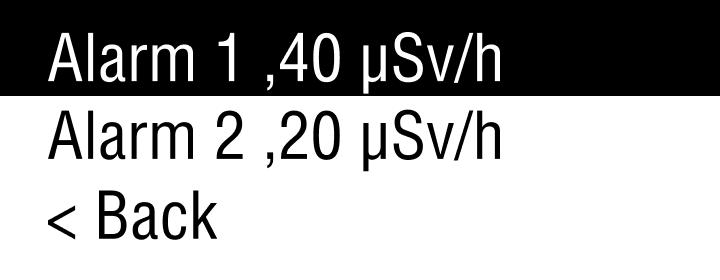 |
Dosis | Einstellungen der Schwellenwerte 1 und 2 für Dosisalarme; Zurücksetzen der akkumulierten Dosis. | 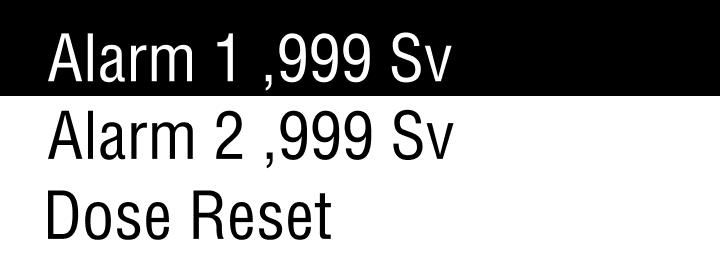 |
Bildschirm | Auswahl der Hintergrundbeleuchtungsparameter und Ausrichtungsmodi eines Displays. | 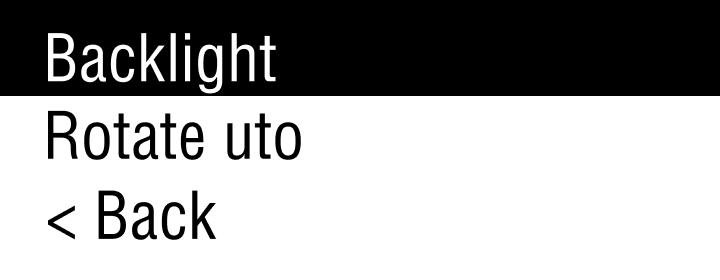 |
Signale | Global: Ein-/Ausschalten von Ton und Vibration; Gamma-Quanten-Registrierung: Ein-/Ausschalten von Ton (Klicks) und Lichtsignalen; Alarme und Tasten: separates Ein-/Ausschalten von Ton- und Vibrationssignalen. | 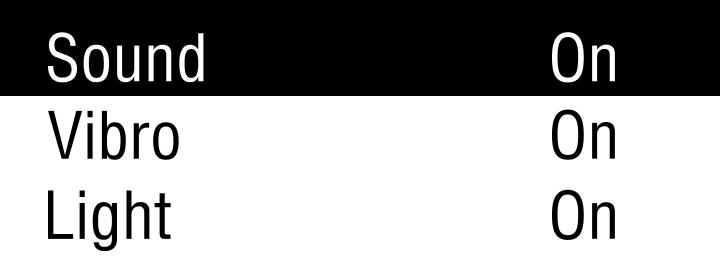 |
Bluetooth | Bluetooth ein-/ausschalten | 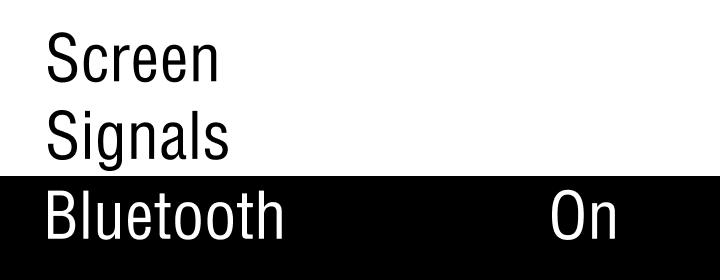 |
Sprache | Sprachauswahl |  |
Zeit | Aktuelle Zeiteinstellung | 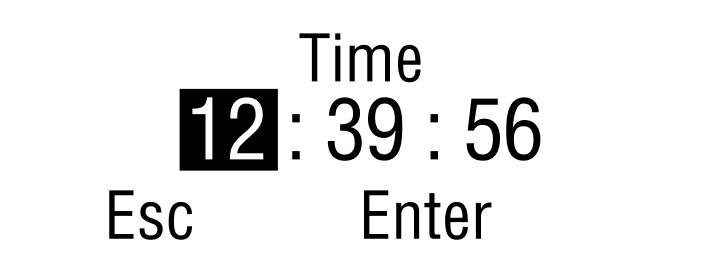 |
Geräteinformationen | Anzeige der Informationen über die Seriennummer des Geräts und die Firmware-Version. | 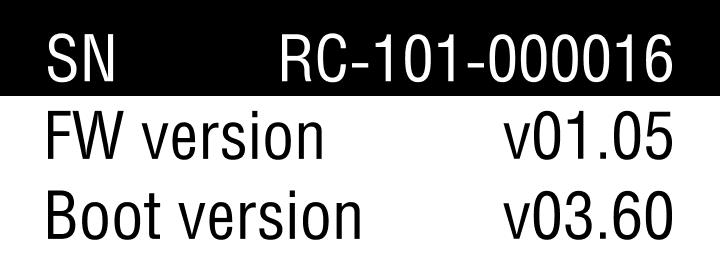 |
Werkseinstellungen | Aufrufen des Menüs zum Zurücksetzen des Geräts auf die Werkseinstellungen |  |
Akkuladung
Zum Aufladen der Batterie:
- Stecken Sie das USB-Kabel in den Anschluss am Ende des Geräts
- Stecken Sie das USB-Kabel in den Anschluss eines Computers oder eines speziellen Ladegeräts
- lassen Sie das Gerät mit der Stromquelle verbunden, bis es vollständig aufgeladen ist
Der Indikator für die Aktivität des Ladevorgangs ist das Leuchten des blauen Indikators. Wenn das Gerät eingeschaltet ist, wird das Symbol auf dem Bildschirm angezeigt.
Wenn das Gerät vollständig geladen ist, erlischt die blaue Anzeige.
Wenn der Akku vollständig entladen ist, reagiert das Gerät möglicherweise nicht auf Einschaltversuche. Um das Dosimeter zu starten, muss der Akku aufgeladen werden. Trennen Sie dann das Kabel und schließen Sie es erneut an. Das Gerät ist betriebsbereit.
Achtung! Verwenden Sie nur spezielle Ladegeräte oder einen USB-Anschluss am Computer, um das Gerät aufzuladen. Das Anschließen des Geräts an eine falsche Stromquelle kann es beschädigen. Eine Beschädigung des Geräts durch unsachgemäßes Laden ist nicht durch die Garantie abgedeckt.
Herstellerinformationen
Radiacode Ltd
10 Spyrou Kyprianou
4040 Limassol, Zypern
Website: radiacode.com
E-Mail: support@radiacode.com
Serviceunterstützung und Beratung
Telegram: https://t.me/RadiacodeEng
Website: radiacode.com
E-Mail: support@radiacode.com
Aktualisiert: 10. Dez. 2025