Libraries
The storage of spectra, spectrograms, and tracks is referred to as libraries and is stored in the application database. We will refer to a spectrum, spectrogram, and track as an "object."
To open a library, tap the  icon on the control bar (toolbar) of the "Spectrum", "View", or "Spectrogram" tab. The track library can be accessed by tapping the
  icon on the map toolbar.
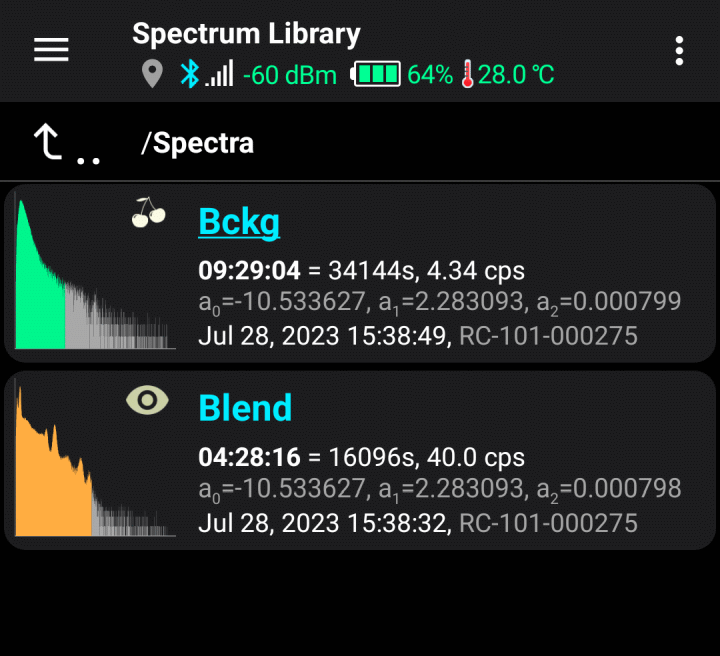
A list of saved objects is displayed. For each object, its name, specified during saving, the recording start date, the device's serial number, and other information relevant to the object type are shown. For tracks created by a device with firmware that does not support energy compensation, a yellow icon appears in the lower right corner. For 8-bit spectra created by a device with firmware version less than 4.00, an orange marker with the number 8 appears in the lower right corner. For each saved spectrum, its graph on a logarithmic scale, name, and accumulation time are displayed.
You can create folders to organize the library more conveniently. Manage folders through the options menu, accessible by tapping the three-dot icon in the top right corner of the screen. The options menu also includes:
- Search: an input line appears where you can enter part of the object's name. Only object names containing the entered substring will remain on the screen. The search is performed within the displayed folder, meaning this function essentially works as a filter. To find an object located in a folder, you need to switch the display to "Simple list without folders" mode through the same options menu before searching.
- Import object: the system file selector opens. For more information, see "Export and Import".
Tapping a line opens a dropdown menu:
- Open object: load an object for viewing (the track opens on the map). If the object is a spectrogram and is currently being recorded, it will continue in the background. To return to the graph of the spectrogram being recorded, tap the
 button on the "Spectrogram" tab and select "Close spectrogram".
 - Share object: export the object's data and "share" this file, i.e., save it in the smartphone's memory, send it by email, or via messenger. For more information, see "Export and Import".
- Rename object: assign a new name to the object.
- Edit comment:Set or edit a comment for the object. A comment is arbitrary text displayed for the object in the library in blue.
- Delete object: remove object data from the library.
- Move to folder: move the object to another folder.
- Picture: a menu appears to manage the attached picture.
- Select: switch to object marking mode. A check mark appears at the bottom left of the graph:
Select all objects by tapping them, and then tap the symbol with three vertical dots in the upper right corner of the screen to perform a group operation

A dropdown menu will appear:
- Select all: mark every object in the library.
- Invert selection: change unmarked objects to marked and marked ones to unmarked.
- Delete selected:Delete marked objects after confirmation.
- Export selected: export all selected objects.
- Move to folder: move the selected spectra and/or folders to a different folder.
- Sorting:Select the sorting mode for items in the list: by name/date, ascending/descending.
- Cancel: deselect all items and exit the mode. This can also be done using the “Back” button on the smartphone.
There are additional items in the menu for spectra:
- Merge selected: perform the channel-by-channel addition of data from the selected spectra. Only spectra obtained with the same device can be combined. A new spectrum is created, and you are prompted to enter its name for saving in the spectra library. The number of pulses in each channel of the combined spectrum is the sum of the pulses in the corresponding channels of the combined spectra. The accumulation time is calculated similarly.
- Edit calib. coefficients: A dialog window opens where you can set the calibration factors for all selected spectra. This is useful if the device used to take the spectra has been recalibrated.
Additional options in the track library menu when multiple items are selected:
- Merge Selected: merge the selected tracks into one. The tracks are combined without any checks. You will be prompted to select a name for the merged track and open it on the map.
Updated: Jan 8, 2026