Overview
The Radiaсode application offers features related to photos:
- Capture photos with overlaid images of graphs, search results, spectrum, spectrogram, activity diagrams, tracks, and logs.
- Linking photos, including those taken outside the application, with spectra, spectrograms, tracks, and log entries (attaching photos).
- Viewing attached photos, replacing them, and deleting them.
- Exporting and importing spectra, spectrograms, and tracks as zip archives with photos, including multiple objects simultaneously.
For photo-related operations, the application requests permission to access media files and to take photos.
Taking photos
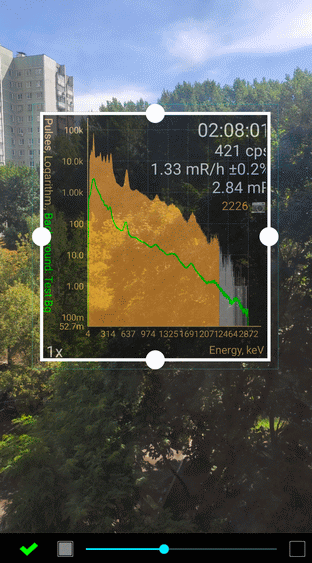
To enter shooting mode, select "Camera" from the main menu, accessed via the  icon. A screen will open displaying an image from the smartphone camera (preview) with a graph, spectrum, track, etc., superimposed on it. The specific type of overlay that will appear on the camera image is determined by the page in the application that was active when the camera was accessed.
Access to camera mode is restricted if taking a photo is unnecessary, such as when there is no object to associate the photo with. For instance, if the "Spectrum" tab is active but the device is not connected and there is no spectrum data, or if the track is not recorded in map mode.

The ring button captures the picture. The current zoom factor is displayed inside the ring. You can adjust the zoom with a pinch gesture, similar to other camera interface implementations.
Touching the screenfocuses the camera and adjusts the exposure at the point of contact. At this moment, a white rectangular frame appears for a few seconds. The overlay (in the picture - the spectrum) is "transparent" to touches.
 open the camera settings.
 enters the mode for adjusting overlay position, size, and transparency:
You can adjust the size and position of the overlay by dragging the circles on the frame. The slider below the image controls the transparency of the overlay, and touching the squares next to the slider sets it to full opacity or full transparency. The settings for the position and transparency of the overlay are saved separately for each type of overlay and smartphone screen orientation.
 toggles the flash mode: automatic/on/off.
 toggles smartphone cameras between front and rear.
After capturing the image, it is displayed on the screen with an option to save it and, if desired, attach it to the object (in this case, the spectrum). For tracks, the image is attached to the last point of the track, and for graphs, it is attached to the last entry in the database.
The display settings in the overlay window match those of the page from which the camera mode was opened. Due to the scaling of the overlay window, the image may differ from the original, particularly for spectrograms.
Access to attached images
In the charts, attached images are represented by a camera icon:
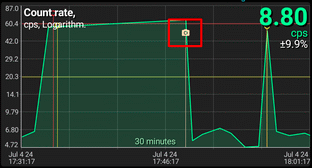
Pressing and holding a point on the chart that corresponds to a picture opens a drop-down menu with the item "Picture." The "Picture" submenu includes the items:
| Item | Description |
|---|---|
Open | Open image for viewing. Depending on the application settings, either the built-in viewer or an external program is used. External programs, such as the system Gallery, provide more functions when viewing. The built-in tool allows you to directly detach an image from an object (spectrum, track...), as well as open an image with an external viewer. |
Detach | Detach the image from the object. |
Detach and delete | Remove the image from the object and delete it from the smartphone's memory. If the image is attached to other objects, you will be asked to confirm its deletion. |
Attach... | Attach a picture to the object. The system's selection tool will open to allow you to choose a picture file. If the object already has a picture attached, it will be replaced with the selected one. |
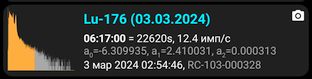
In the spectra, spectrograms, and tracks libraries, the presence of an attached image is indicated by a camera symbol:
The drop-down menu that appears when you tap a row in the library includes an item called "Picture," which provides the same menu for managing an attached picture. If the picture is not attached, only the "Attach" option will be available.
For tracks, you can attach images not only to the entire track but also to individual points. Tapping the camera symbol on a track point also displays a menu for managing its image.
Export and import objects with images—see here.
Additional information
Due to the unique characteristics of the Android operating system, including the increasing security requirements with each version, applications cannot always access image files, especially if these files are located in non-standard folders. In some cases, depending on the version and manufacturer of the smartphone, the system denies access to certain files. Sometimes the system does not allow the RadiaCode application to directly open an object file (spectrum, track, etc.) from a messenger. In such cases, you should first save the file to a folder and then open it.
The application saves photos taken with the camera in the RadiaсodeImages subfolder of the standard DCIM media folder. This enables system viewers (Gallery) to access these photos. An exception occurs when photos are taken on an Android system version lower than 10 and a removable storage device is chosen for storage—in this case, the photos are stored in the DCIM/RadiaCodeImages subfolder within the application folder itself and are deleted when the application is uninstalled.
Updated: Jan 8, 2026